Remove the heater, mounting kit, and packaging insert frame from the box. Keep the packaging materials for future use.
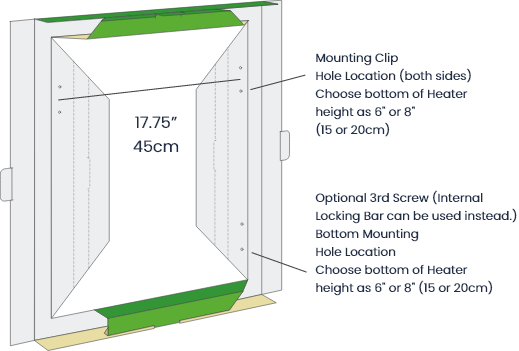 Fig. 1
Unwrap and flatten the sides of the packaging insert frame (mounting template) and stand the template on the floor. The sides of the template have pre-punched holes to mark the heater mounting height for either 6” or 8” (15 or 20cm) from the bottom of the heater to the floor. Choose either mounting height, and mark three hole locations on the wall. (see Fig. 1). The top two hole locations are for the mounting clips and the bottom location is for a third mounting screw hidden inside the bottom access door as described in step 5 below.
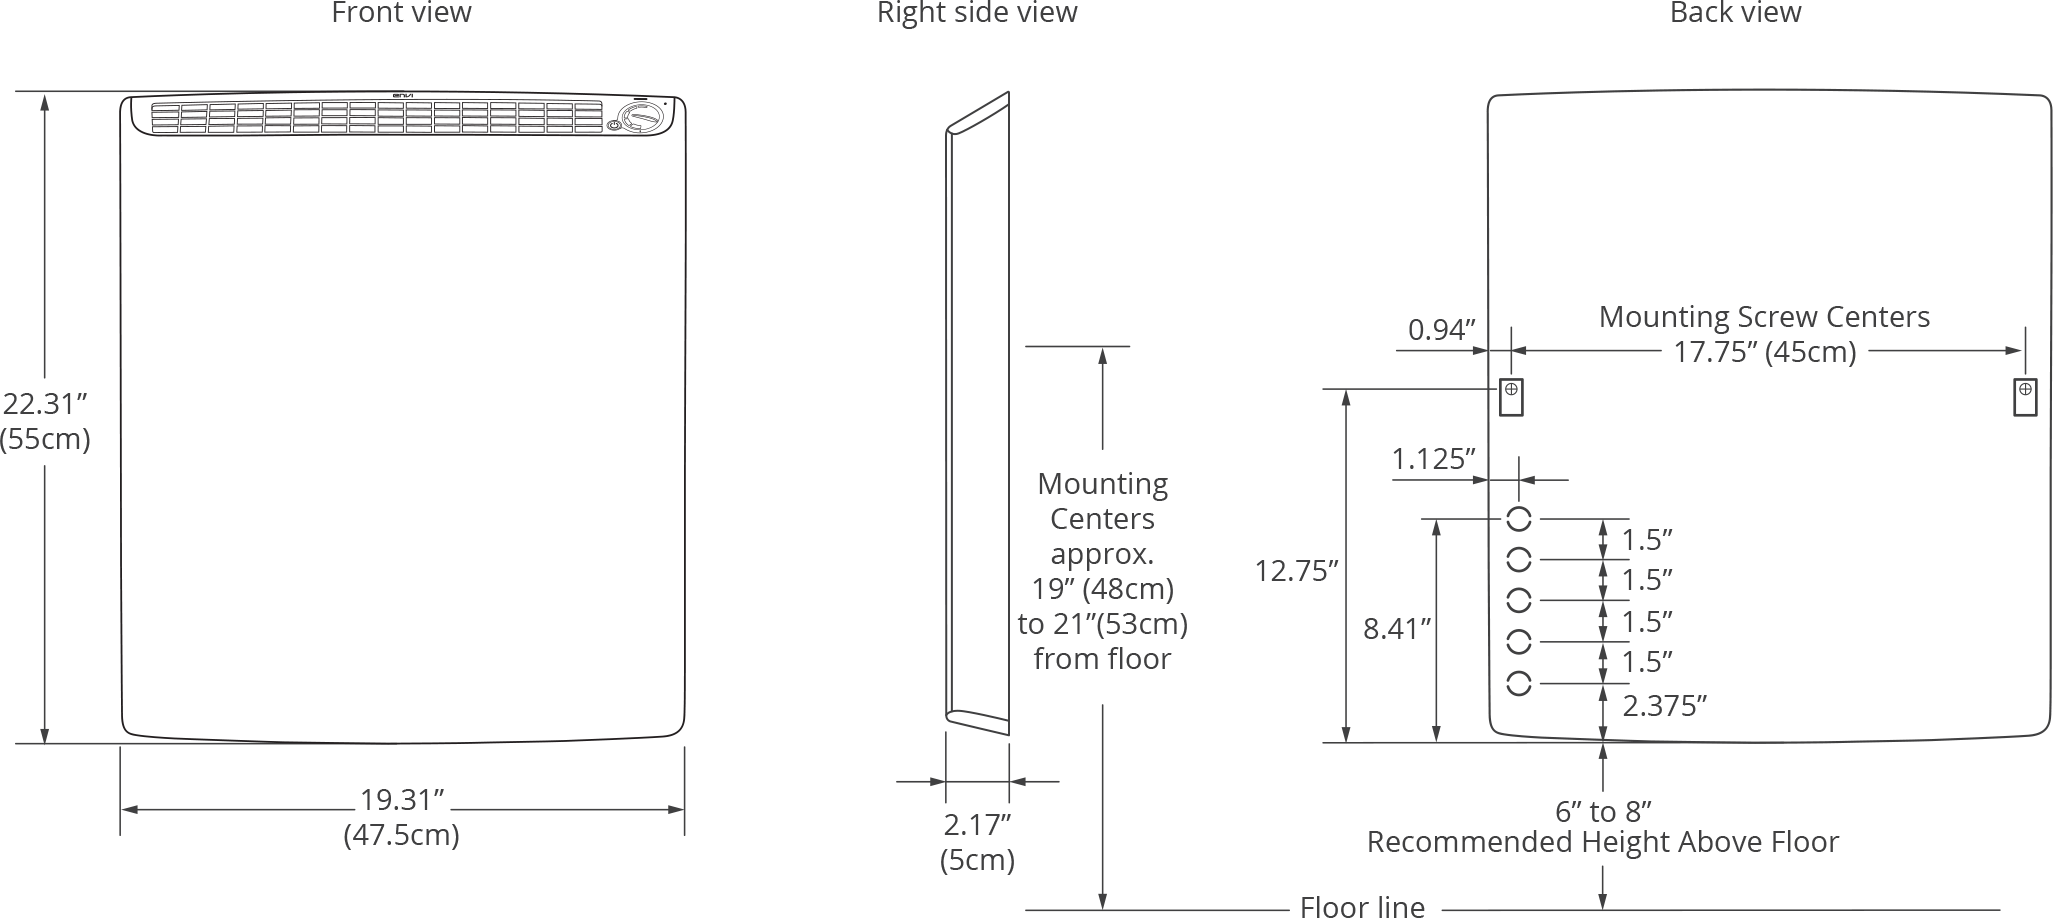
NOTE: Most installers use the internal locking bar screw ONLY instead of the bottom mounting hole.Screw the anchors (Fig. 2) into wall at the marked locations. The distance from the top screws to the floor should be approx. 19” to 21” (48cm to 53cm). If a stud is in the way, do not use the drywall anchor supplied, just drive supplied mounting screw directly into the stud. For masonry walls, use the masonry wall anchors provided and drill a 4.5mm (3/16inch) hole using a masonry drill bit (not supplied).
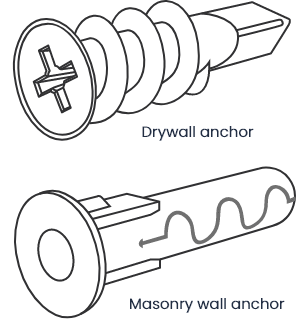 Fig. 2
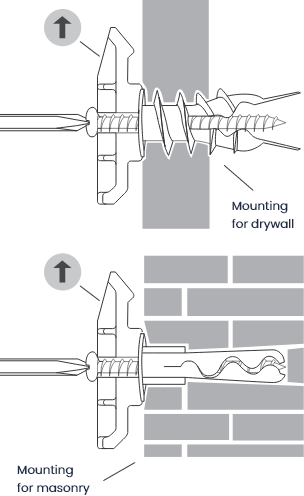 Fig. 3
Screw the two mounting clips (with arrow pointing upward) into the top two anchor locations and secure firmly to the wall anchors using the provided screws. (see Fig. 3). DO NOT overtighten. There should be a gap behind the mounting clip to hang the heater on.
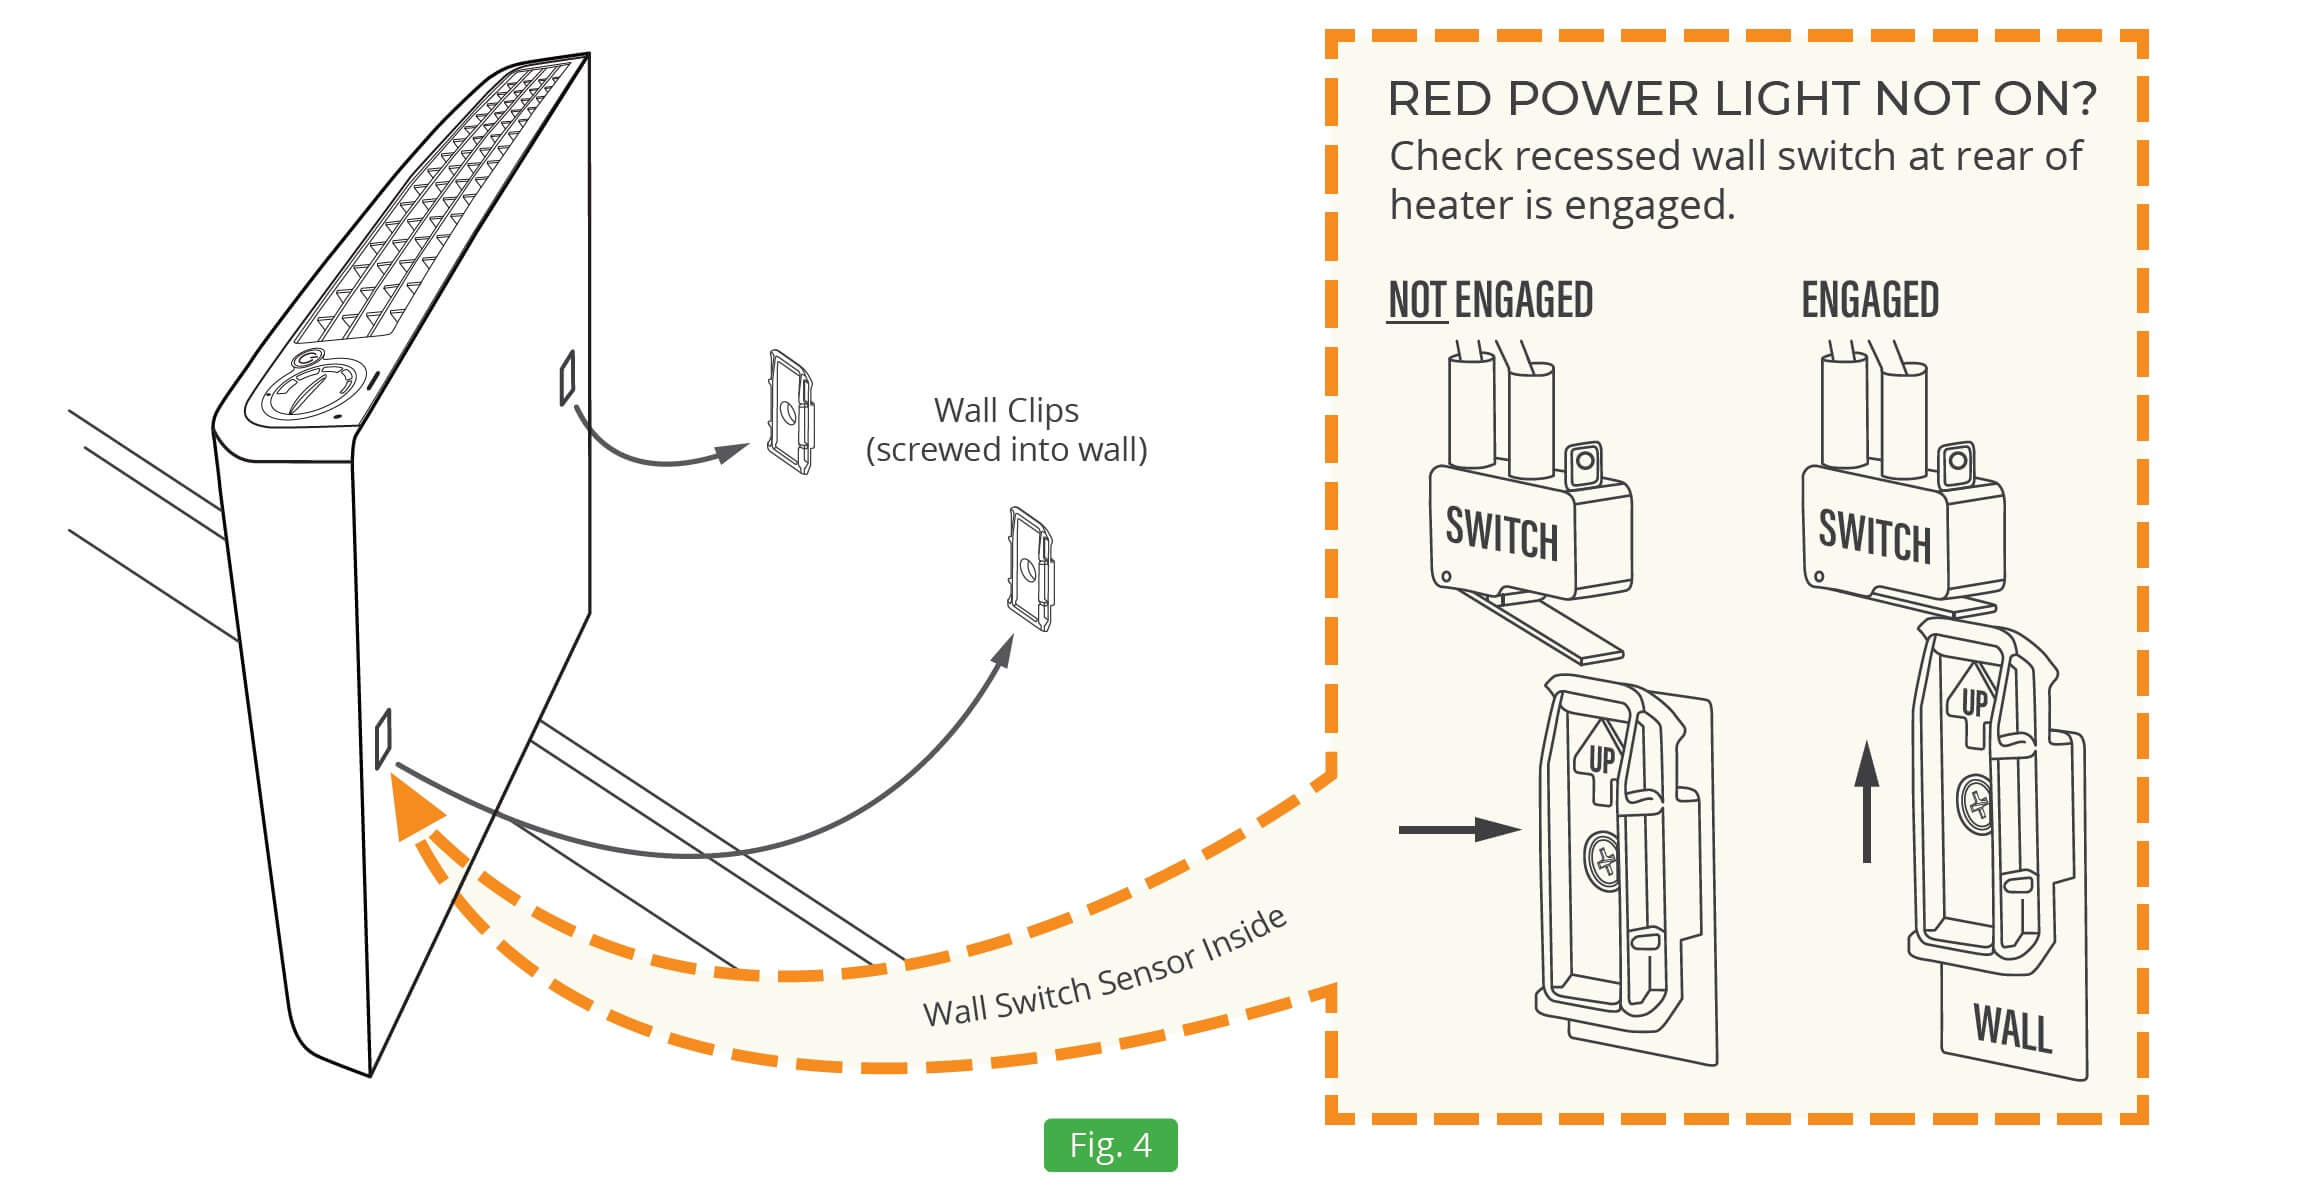 Fig. 4
Note: make sure you pre-install the Locking bar screw before you mount the heater. (See Fig. 4 below). Install heater on mounting clips (align right side first) and make sure to press down firmly on the heater to ensure a secure fit. You will hear it “snap” into place. (Fig. 5 above)
Envi Wall-Mounted Heaters have an additional method to permanently attach the heater to the wall. A locking bar mechanism is built inside the heater, which is engaged by screwing an external locking screw into the bottom of the heater vent.
The locking screw and Hex/Allen Key are both provided in the mounting kit. This locking bar method is an alternate method to the existing bottom screw installation procedure above, however many customers will find that the locking bar attachment method is sufficient by itself.
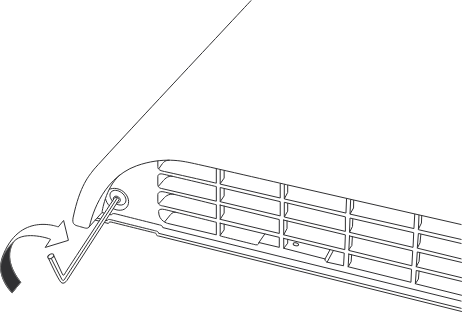 Fig.5
Fig.5
BEFORE YOU MOUNT THE HEATER TO THE WALL. Take the locking bar screw out of the mounting kit and while the heater is laying flat, use the Hex/Allen key provided to pre-install the screw in the hole at the left hand side of the bottom vent (Fig. 5). Twist the locking screw in about 3/8 of an inch but make sure you do not screw it in too far as it will obstruct the mounting holes at the back of the heater and prevent secure mounting.
Attach the heater to the wall by following the rest of the mounting instructions on previous page.
 Fig.5
Fig.5
Follow the rest of the mounting instructions to ensure the heater is properly seated on the mounting clips and then tighten the locking screw to fix the heater to the wall. DO NOT USE A POWER TOOL! DO NOT OVERTIGHTEN, just turn the screw until the locking bar presses gently up against the left hand mounting clip inside the heater.
If the heater will not operate, please check the following before calling for help with technical questions:
The number one troubleshooting tip is to check that the internal, electrical safety switch (Wall-SensTM) is being engaged. The heater WILL NOT OPERATE AT ALL if this switch is not engaged. This problem occurs when the right hand side of the heater is not pushed down far enough between the gap between the wall and the mounting clip. The mounting clip can become squished if it is screwed in too hard. Uneven walls can also cause the same mounting/wall switch problems.
Check if the power cord is plugged into an electrical outlet and the heater is set to ON by confirming the light on the front of the panel is lit. If not, plug in the heater and press the on/off power button.
If the heater has been hardwired, consult an electrician to check that all connections have been made correctly. Make sure that you hardwire the correct voltage. Many people do not understand how to work with 220volt wiring. Always triple check the voltage and the model heater that was purchased as this is a common mistake and can lead to heater malfunction and pose a serious safety risk.
Check if there is electricity to the circuit by checking to make sure the breaker in the breaker box is in the “on” position.
| Power Rating: | 500 Watts (All Models) |
| Volt & Amp Rating: | LE5012D/N Models = 4.17 Amps @ 120volts LE5022D/N Models = 2.27 Amps @ 220volts |
| Unit Size: | 19.3in W x 2.2in D x 2.27in H (49.0cm W x 5.6cm D x 56.4cm H) |
| Net Weight: | 10 lbs (4.5 kg) |
| Packaged Weight: | 12 lbs (5.5 kg) |
| Conforms to UL Std: | UL 2021 | ||||||||||
| Cert. to CAN/CSA Std: | C22.2 No. 46 | ||||||||||
| Conforms to IEC Std: | 60335-1 & 60335-2-30 | ||||||||||
| Conforms to AS/NZS: | 60335.1 & 60335.2.30 |

"I ordered 5 of these units and although I haven’t installed them all yet, the ones I have are performing as expected. I’ve purchased Envi heaters previously, hence the reason I’ve ordered more. I use these heaters in my own home as well as my rental property, to heat areas the gas forced air ductwork wasnt installed.
Youngwelder1
"I had a little problem getting the heater adapted to a very uneven wall in a 10 X 14 insulated shed I am making into a small wood shop, but after getting it mounted it has worked fine and kept the temperature at a steady degree of comfort and makes it easy to work around the heater since of the low profile."
Bob
"These are great little units that pack a ton of heat. They are super sleek and heat our over the garage in-law unit perfectly. The price is affordable for what you get. I have tried other brands and this one is by far the best looking and best heating unit I have purchased. "
Josh
Get yours today and join the 200,000+ Satisfied Customers
Order Now


